Showing posts with label first birthday. Show all posts

Sep 22, 2012

Minnie Mouse Highchair


I'm sad.  This is the last of the "Avery's Minnie Mouse Birthday Bash" tutorials I'll be posting.  I hope if you're having a Minnie themed party of your own, you've gotten some ideas for your party too!  So, here it is, the last tutorial:  *drumroll*  a Minnie Mouse highchair (as seen here as my little girl chows down on her birthday cake)!

 I lucked out on this chair.  I had been wanting a cheap highchair for pictures to paint a bright color, like yellow or turquoise, until we decided that Avery would be having a gigantic Minnie Mouse party and this idea was born. 
Wanna know how to make one for yourself?  Here's what you'll need:
  • Highchair (obviously)
  • Black spraypaint
  • Minnie Mouse polkadot fabric
  • Foam circles
  • Polka dot ribbon
  • Hot glue gun
  • Sandpaper
I found my highchair at Goodwill for.....get ready.....$5.  The legs wobbled a bit and it didn't have a tray to go with it, but it was FIVE DOLLARS.  I could deal.  It was also a little bit dirty.  So, step one was to sand the highchair down to remove all the stickers and junk that littered the arms and seat of this bad boy. 

After sanding, I began to spray paint. It took two coats of black spray paint (I bought the cheap Walmart brand) to cover the whole thing.


When the chair was spray painted and dry, I brought it into my house to add the Minnie skirt along the bottom.  Finding the fabric that perfectly matched Minnie's skirt ended up being the hardest part of this project.  I went to FOUR different fabric stores before I found the perfect print (Thank you JoAnn's Fabric).  I got two yards and it ended up being JUST enough, so get 2 1/2 or 3 to be safe.  I was sweating as I was coming to the end because I really thought I was going to run out.  Here's how to attach the skirt (and if my instructions don't make sense, hopefully the pictures will....I'm a visual person, not a descriptive one). 
Take your hot glue gun and put about an inch worth of glue along the chair and attach the fabric.
Now, put about a quarter of an inch of glue along the end of the fabric that you've just glued to the chair.  Fold the fabric back and glue it down. 
Repeat the above two steps.  You'll be creating a sort of ruffle effect along the entire chair. 
Once you've done a few "ruffles," you'll get the hang of how to do it.  Continue along the entire chair. 
When I first started working, I wanted a floor length "skirt" on my highchair.  Because I didn't get enough fabric, I had to cut it in half to have enough to finish the entire chair.  I like the finished look better, I think.  It's appropriate because Minnie doesn't wear a floor length skirt!
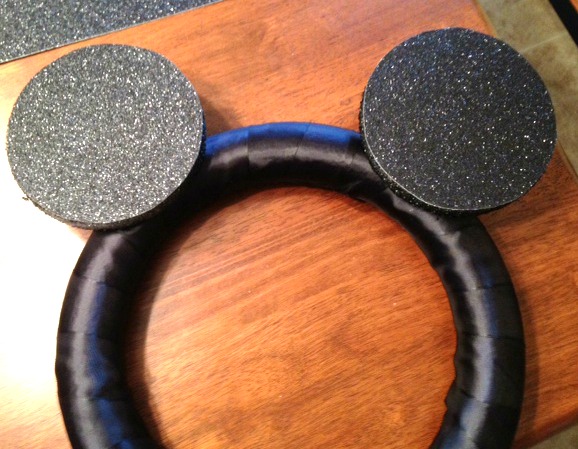
After you've finished the skirt, spray paint the two foam circles black (this will take MULTIPLE coats with a heavy hand because the foam soaks up the paint like crazy).  Then attach with a hot glue gun to the sides or top of your chair.  Glue a matching red and white polka dot bow to one of the ears and you have your very own Minnie Mouse highchair!!
I hope you all have enjoyed the entire Minnie Mouse series!  If you're interested, check out Avery's Minnie birthday invitations and envelopescanvas bag party favors, personalized Minnie Mouse wreath and Minnie Mouse birthday bash recap (including a Minnie Mouse Cozy Coupe)!  Now, what to do for the 2nd birthday......


Sep 15, 2012

Minnie Mouse Initial Wreath

I promised you tutorials on how to make a few of the personalized items that I had included at Avery's birthday party.  I'm just not a "cookie-cutter" kind of party planner.  I'm not all for going to Wal-Mart and buying the package of coordinating plates, cups, napkins, table runners, candles, etc.  I'd rather have a handmade and from the heart kind of party.  I'm not knocking you if that's the kind of party you like to throw.  Lord knows, it's wayyyyy easier than the route I took.  But if you're like me, here's a tutorial on how to make your very own Minnie Mouse Initial Wreath.  It hung on the front door to welcome guests into the party and now is hanging proudly in Avery's room.  Ready to make one for the Minnie fan in your life?  Grab your hot glue gun and let's get started!

Materials needed:
  • Styrofoam wreath
  • 2 small Styrofoam circles
  • Black cardstock paper
  • Initial of your choice
  • Small circle sponge brush
  • Red and white acrylic paint
  • Ribbon
  • Hot glue gun
{step 1}
I started with my Styrofoam wreath and wrapped all the way around with a silk black ribbon to create the base for my wreath.
{step 2} 
After the wreath was wrapped, I took the two smaller Styrofoam circles (that had already been spray painted black) and hot glued them to the top of the wreath as Minnie's ears. 
{step 3} 
Taking the black cardstock paper (I picked glitter paper--thought it looked more "girly"), I cut out two circles that were the same size as the Styrofoam circles and hot glued them onto the front.
{step 4}
I painted my wooden letter A in cherry red to match Minnie's dress.  Of course, Minnie wouldn't be complete without her signature polka dots!  So I took a small circle sponge brush and white acrylic paint and added polka dots all over the letter.
{step 5}
I attached the letter to the wreath and made a bow out of red and white polka dotted ribbon.  It's not in the picture, but I added some leftover ribbon at the top for the wreath to hang from. 

And voila!  Avery now has her own personalized Minnie Mouse wreath.  I'm thinking about making a family sized one to go on the front door now......

Sep 11, 2012

Avery's Birthday Party Recap

You know when you get on Pinterest and you browse other people's blog posts about their child's perfect birthday party and how everything was completely awesome?  Yeah, my kid's party wasn't like that.  I had spent MONTHS agonizing over and planning this party.  I thought of every single tiny, minute little detail.  I wanted everything to go perfectly.  The reality was much, MUCH different.  It seemed like everything that could go wrong, did.  It rained.  The moisture in the air made it almost impossible for my dad to fire up the grill and make the food.  The air conditioner in my parent's house was thinking about going out.  Because the food wasn't ready, we opened presents first so people could leave if they needed to.....but Avery wouldn't have any of it.  She was cranky.  And overwhelmed.  And hungry.  Finally, the food was ready and people started eating.  Marty and I left the party to go take some professional pictures with the photographer that we'd invited.  Avery wanted none of it.  She didn't want to sit still, she didn't want to smile and she DID NOT want her picture taken.  It was the perfect storm.  Standing on the sidelines, I felt like the party was a huge disaster.  Until I started talking to some of the guests after the party.  No one noticed all the little mistakes and flaws that I was noticing.  Not a single one of them noticed that the food wasn't ready on time or that Avery wasn't in a good mood.  They loved the decorations, the cake and the presents.  I realized that I was expecting everything to be completely perfect and, when it wasn't, I ruined the party for myself.  I couldn't enjoy my daughter's first birthday party because I was worried about what our pictures would turn out like.  Lesson learned:  it's not so much about everything going perfectly.  It's more about enjoying the day and making memories with my daughter.  When I stop and think about that day, I don't want to remember everything that went wrong.  I want to remember the little touches I worked on to make her day as Minnie-fied as possible.  I want to remember her face whenever we gave her a personalized Minnie Mouse Cozy Coupe.  I want to remember all the people that came that loved Avery and Marty and I enough to want to celebrate the day with us.  That's what matters. 

I was really happy with how all of the decorations and little touches turned out.  Each little girl at the party got their very own Minnie Mouse canvas bag...complete with Minnie Mouse bubbles, Mickey ears, Puffs (for the babies) and sunglasses inside.  The drink container came from I Have a Favor.  Cake was made by a family friend, but inspired by a photo I found on Pinterest.  I made the decorations, Minnie Mouse highchair and wreath myself (tutorials to follow!).  But, out of everything, this was my favorite part:
An old Cozy Coupe, transformed into Avery's very own Minnie-mobile!  Have I ever mentioned how thankful I am to have a husband that, not only loves me unconditionally, but puts up with my crazy self and ridiculous requests??  I found this idea from a blog I was browsing and immediately knew that Avery had to have one.  I posted on Facebook and asked if anyone wanted to sell their old Cozy Coupe.  Twenty minutes later, I was the proud owner of one (isn't social media amazing??).  I confronted my husband with the picture and my plan and he got to work.  I couldn't be happier with the way it turned out and Avery LOVES IT.  She wants to climb in and out and honk the horn as much as possible.  Here's a better picture of it the next day:
Then, I got our pictures back.  My photographer works MAGIC.  I didn't think Avery smiled the entire time we were taking pictures, yet somehow she managed to capture some amazing pictures.  I'm still not sure how she did it. 


Looking back, Avery's birthday party was pretty amazing.  I'm the mother of a one year old.  How the heck did this happen??


Aug 22, 2012

Minnie Mouse canvas bags how-to

It's supposed to be an "Organize One Thing Wednesday" kind of day, but  I still have that specific project on my mind and I STILL can't find the materials I need.  Maybe this is the universe telling me that I need to learn how to sew so I can just make the idea myself.  harrumph.

Instead, I'm going to be posting one of MANY tutorials from Avery's Minnie Mouse themed 1st birthday!

This week:  Minnie Mouse canvas tote favor bags!
I knew I wanted to do something a little different than the plastic-favor-bag-picked-up-at-WalMart route for Avery's little friends.  I had a couple of canvas tote bags laying around...and the idea was born! 

Materials Needed:
  • Canvas tote
  • Black, red and white fabric paint (I prefer Tulip brand)
  • Round sponge brush
  • Medium sized paint brush
  • Pencil
  • Cereal bowl
  • Small drinking glass
{step 1}
Find two rounded items to use for Minnie's head and ears to trace around.  I chose a cereal bowl and an orange juice glass.

{step 2}
Trace around items with pencil.
{step 3}
Using your medium sized paintbrush and black fabric paint, trace around each edge of the circles.  To make it easier, I squirted the paint out onto a paper plate for easier dipping.
{step 4} 
Fill in each square with the rounded sponge brush.  You could also use the regular paint brush to finish the entire Minnie head, but I found the sponge to be easier. 


{step 5} 
Add the details.  I free handed a big red Minnie Mouse bow and wrote each little girl's name on each of the bags with the white fabric paint.  But this is your bag....get creative!
Inside each bag, I added the standard party favors:  cheap, but fabulous sunglasses, Minnie Mouse bubbles, Minnie ears and a container of Puffs (for the babies).  They were a hit!  Of course, these don't have to just be for parties.  Make one for your little girl to carry to school or to use as a purse.  Or, if you're a grown-up Disney freak like me, make one for yourself!  Use it as a work bag, a diaper bag, a reusable grocery bag....the options are endless!!
Stay tuned for more Minnie Mouse party themed decorations and tutorials!!

Aug 8, 2012

Organize One Thing...Interrupted.

I interrupt this regularly scheduled "Organize One Thing Wednesday" to bring you.......my kitchen. 

Holy party throw-up Batman.  Avery's 1st birthday party was this weekend and, as you can see, I'm still recovering.  Am I the only one that gets an after-huge-event hangover?  Not the alcohol kind, but the "I planned my rear off for months and spent the week of hot-gluing and decorating and obsessing over every single detail so now I feel like doing absolutely nothing but sit on my couch and watch the Olympics" kind.  I literally have done nothing domestically related since Saturday.  Well, that's a lie--I unloaded and reloaded my dishwasher....once.  And that was only because Avery needed clean bottles.  After her party, I told Marty to just dump everything in the kitchen one night and I would pick it up the next day.  Well, here it is, Wednesday already, and I've done nothing.  But my kitchen is starting to smell and Avery wants to rip up every bag that's laying in the floor.  Not to mention the fact that I want to have a panic attack every time I come into my home.  So, as much as I would love to share my organizing tip for the week, I've got to do a little personal home organizing of my own.  I promise though, next week's project is going to rock your socks off. :)

Jul 28, 2012

To my Avery, on your first birthday.

My sweet Avery girl,

I can't believe you're already a year old!!  A year ago today, I was laying in my hospital bed wondering how I could ever love anything more than I loved you at that moment.  I'd known you less than 24 hours, yet you were completely perfect and I knew that I had been put on this world to be your mommy.  Over the last year, I've watched you grow and learn.  I've watched you develop a personality (and an attitude!).  It's so funny to watch you learn something new...you're so proud of yourself whenever you finally master it and you look over at your daddy and me to make sure we're watching you.  You're so smart (doesn't every mother say that??).  You bring joy to everyone around you--your personality is contagious!  Your entire family loves you beyond words and spoils you to no end....all you have to do is point and grunt and people go running to get you whatever you want!  It's been a joy to watch you learn different stages---rolling over, crawling and now walking!!   To watch you learn new words and phrases (your favorite right now is "I want that!") and use them more and more everyday.  You go nowhere without your Minnie Mouse doll and we quickly have a panic attack on our hands when you realize she's not in reach.  Unfortunately for mommy and daddy, you still don't sleep well through the night and don't nap much, but you'll learn!  You are the complete spitting image of your daddy---busy, can't sit still, into everything you can get your hands on and completely adorable.  I know you've only been in our home for a year, but I can't remember what life was ever like without you.  I thank God every morning that I get to wake up and spend another day watching you grow.  Nothing matters more to me than being your mommy.  I love you so much sweet girl.  Thank you for making your first year the best one of my entire 26.  Happy birthday.

Love,

Mommy

Jul 18, 2012

Minnie Mouse Birthday Bash--Invitations {part 2}

You may remember my post from a few days ago where I made my own Minnie Mouse invitations.  Today, I'm sharing part 2 of making these labor-intensive, but freakin' adorable invites. 

I started by making a simple Microsoft Word document to make the actual invitation.
The "Mickey Ears" font can be found and downloaded to your computer here.  The other adorable font is from kevinandamanda.com.  Amanda takes handwritten samples that people send to her and makes them into downloadable fonts.  I love all of the "Fonts for Peas," which is where this one came from (Pea Rinnybird).  I just played around with wording and font choices until I found something I loved.
Because these invitations were long, I was able to fit two on one page of paper, when turned "Landscape" style on Word.  Print them out and cut the page right down the middle to give you two invitations---saves paper! 
I had to fold my paper invitations pretty small to get them to fit in Minnie's pocket.


After they were folded and stuffed into the Minnies, it was time to stick them in their envelopes! 

I made labels that coordinated with the font that was in her invitation.  Because the CD envelopes were so small, I used the return address labels to seal--working double duty!

And they're done (big thank you to my assembly line...I mean, family...for helping me put together all 31 invitations)!  Send them out to your party guests and listen to the comments you get back about how adorable they are...and you'll know all your hard work was worth it! 

Come back next week to see how I turn a Goodwill high chair into a Minnie Mouse chair fit for our birthday princess!

Jul 12, 2012

Minnie Mouse Birthday Bash--Invitation Tutorial {part 1}


Avery is turning one soon and I am in full-blown party planning mode.  Thanks to Pinterest and its abundance of Minnie/Mickey themed party ideas, I have a million things I want to do.  Obviously, people have to KNOW about the party, so I'm tackling the super-adorable-but-crazy-time-consuming-and-overambitious invitations.  And if you're crazy like me and want to keep some money in your pocket by making your own invites, then this tutorial is for you. 
When I first started thinking about themes and looking at invitations, I came across these:
{via}
I died.  Can words describe how cute these are??  I immediately clicked the link, searched through her Etsy shop.....wait.....does that say $27.50 for a set of 10 invitations??  Considering my family is ginormous and we're probably going to have close to 40 invitations to send out, that means I would be paying a whopping $110 for 1st birthday invitations!  Not happening my friend.  So I tried looking at other (and less) expensive options for my sweet girl's party.  I found nothing that I liked as much as these sweet invitations.  That's when I temporarily lost my mind and decided to make these invitations by hand.  For you penny pinching birthday planners like me, here are the steps I used to make my very own Minnie Mouse invitations.  {Warning....this tutorial is about to go picture and detailed description crazy.  I like step by step pictures because I'm more of a visual person.  Oh, you too? *friends*}  Ready?  Let's go.
{step1}  I started by purchasing black and red poster board for Minnie's head and dress.  If you're sending out a smaller quantity of invitations, you can also purchase red and black cardstock.  I knew that I would need to be making these in bulk, so I went with the poster boards.  I did splurge a little here and buy the posters at Michael's instead of from Wal-Mart or Target.  Reason being is the color is a little richer and not so washed-out looking.

{step2} I knew that these invites would be a little funky shaped, so I went to my nearest office supply store and bought the only square envelopes I could find--CD envelopes with the window (which needs to be covered up before mailing).
{step3} Next, I laid one of the envelopes down on the black paper and traced out the shape so I knew exactly how much room I had to work with and how big my Minnie heads could be.

{step4} After having the envelope size, I found a cup that was the perfect circle shape for Minnie's head. Laying it on the black poster board, I traced around the cup in pencil.
{step5} When I found the perfect circle shape for the head, I went on the hunt for a circular item for the ears that were in proportion to the head. I used one of Avery's bottle tops, but you can use any item laying around the house that is circular shaped and is about the right size. Trace around it with pencil.
{step6} Once you have your Minnie head drawn, cut it out.
  {step 7}  Take the same cup you used for Minnie's head and draw a circle onto the red poster board.  Cut out.
{step7}  Line the red circle up with Minnie's head that you cut out of the black poster board.
 {step8}  By eyeballing the red circle or measuring it out, cut it in half. 
{step9}  Glue a line in a half circle shape along the bottom of Minnie's head (kind of making a smiley face). 
{step 10} Place one half of the red circle on the bottom half of Minnie's head where you just placed the glue.  This will create a pocket for you to put your written invitation inside!
{step11}  Every good Minnie fan knows that Minnie wears a polka dotted dress.  To create the dots, I took a circle-shaped punch (purchased at Michael's) and punched out multiple circles out of white cardstock paper.  I randomly placed the circles along the red poster board and glued them on with tacky glue.
{step12}  Here's where you can get a little creative.  Minnie Mouse would not be complete without her signature bow.  I had originally purchased thin ribbon that was red with white polka dots to match Minnie's dress.  When I made the bow and held it up to the invitation, I wasn't happy with the overall look.  For a bigger punch, I decided to make Minnie's bow out of red poster board just like the dress.  I free-handed a bow shape onto the poster and cut it out.
{step13}  After cutting the bow out, I took a fine black Sharpie marker and added little details.  After that, I took a regular hand hole puncher and cut out smaller polka dots from the white cardstock and glued those onto the bow with a glue stick.  After that was completed, I then glued the bow onto Minnie's head.  Ready for the final product?  *drumroll*
I am completely aware that this isn't perfect.  I can't cut a straight line or circle to save my life and it's not as pretty as the ones I originally found, but they're close.  Better yet, I saved a TON of money.  All I needed was black and red poster board, white cardstock (which I already had) and the circle shaped hole punch.  All in all, I probably spent $15 on the entire project.  A savings of almost $100.  In my next tutorial, I'll be showing you how I attached the actual invitation with the party details.  Happy penny pinching party planning (say that five times fast!!)!

Pin It

LinkWithin

Related Posts Plugin for WordPress, Blogger...